
News, Other Tangents
Lego the Logo
If you've been to our office, you've seen our logo, customized in a giant Lego banner, spanning two walls. David Litzler is the metal craftsman behind it. Here, David explores the details of how it was realized, from design to fabrication.
October 14, 2014
As part of the office remodel and expansion project, a Board & Vellum logo wall panel was designed to be installed behind the new reception desk. While it's not quite finished yet, we are excited to share with you some process and progress photos for this fun little side project.
The basic design consists of two wall panels, one short and one long, coming together at an inside corner behind the reception desk. The longer panel will have the Board & Vellum logo, an ampersand inside a square, located near the far end from the corner. Continuing the tradition of Lego in our office, the wall panels will be clad in Lego base plates and the B&V logo will be recreated in Lego plates in the approximate location and size represented by the blue tape square in the photo below.

The next step was to detail how the panels would be fabricated, assembled, and installed. The basic parameters were the panels should be framed in steel angle, mitered and welded at the corners, and mounted to the wall in such a way that no fasteners would be visible. To accomplish this, we opted to use a French cleat system that fastens to the back of the panels and also to the wall studs. The French cleats allow us to hang the panels tightly to the walls without any significant gaps between the back of the panels and the face of the walls. They also allow us to remove the panels from the wall with ease when necessary, rather than making the panels a permanent, built-in installation. A couple of small, discretely located “stop” fasteners installed along the top edge will ensure the panels do not jump off the wall cleats during an earthquake. Below is an early design development sketch that illustrates the fabrication and assembly concepts.

Next, we fabricated a quick mock-up of the panels at the corner intersection as a proof of concept. This proved to be a very useful exercise, as we ultimately decided against making the two legs of the steel frame as one continuous piece. The reasoning behind that decision was two-fold: 1) attempting to match the exact angle of the inside corner of the existing framed walls is not practical and would likely result in a gap at one of the leg ends, and 2) keeping the two panels separate allows the longer panel to be used by itself in any future installation – the shorter panel is open on one end where it butts into the longer panel’s frame, and therefore cannot be used by itself. Below are a couple of photos of the mock-up illustrating the steel angle frame with a proposed reveal between the frame and plywood backer board.


Following the mock-up we revised the details and started the fabrication phase. We’ll let these photos speak for themselves (mostly… there are brief captions) as they illustrate the fabrication process and progress to date.

The plywood backer boards, shim/spacer strips, and homemade French cleats are cut and temporarily stored out of the action area.
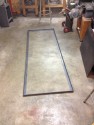
The large frame is cut and laid out prior to welding.
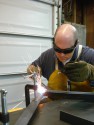
Welding the steel angle frame with Oxy/Acetylene and steel filler rod.

Grinding the weld beads flush.

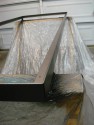
The large frame with plywood backer board sitting inside... just checking the fit and all is good!

The small frame with plywood backer board.

Here’s a detail shot of the reveal (architecture speak for designed gap) between the frame and panel board.
The frames are painted! Both frames were drilled and the holes were countersunk for flat-head wood screws that fasten the plywood to the frames from the back – see the second mock-up photo above.
That’s it for this post. We expect to bring the finished frame and panels in this week and mount them on the walls soon. Stay tuned!


